Back on the 26 March, I wrote a gear-list for what I expected I’d need on the Sounds to Sounds ride. Also, I’ve reconciled the total cost of the event as a guide for future riders.
Cost
In total, for the 17 days on the road, I spent $5,702.18, or $4,442.35 excluding the cost of clothing.
| Clothing (Good for multiple rides, but brought for this one) | -$1,259.83 |
| Accommodation | -$1,321.62 |
| Consumables (batteries, chemist stuff, postage home) | -$141.94 |
| Equipment (includes new bike tire costs, bike handlebar bag, water filter, guidebook) | -$547.09 |
| Food Only | -$693.42 |
| Tracking Costs | -$217.50 |
| Transport (Ferries from Wlg & to Ships Cove, Flight home, Transport from Milford to Te Anau) | -$688.03 |
| Pub Dinners (Dinner and Alcohol) | -$832.75 |
| Total | -$5,702.18 |
| Total – Excluding Clothing | -$4,442.35 |
Here’s the actual spend here: Sounds to Sounds Cost Breakdown
Amended Gearlist
I got it about 70% right – I missed out some things which were subtle but important, and I included some things which were not needed. So, in hindsight, here’s the amendments to my gear list – read my gear-list for links to the items not included here.
The Bike
When I brought my bike, I pretty much replaced most of its core bits. These are bits I didn’t talk about, but they were, in hindsight, essential.
The Saddle
The saddle was important, and I changed the factory fitted for one of these. It made the world of difference! That hole in the middle allowed the blood to flow around that area.
Here’s a little man-secret some ladies might not know. If you have a saddle without that gap, it stops blood flowing to the penis. You won’t notice it until you get off your bike, but your penis goes numb through lack of blood flow. And then you really notice it when the flow comes back, because you get pins and needles in your dick. And it hurts. A lot.
I paid a bit more for the S-Works Power Arc, but it also went well with my Aero bars: I could lean into the lower stance with ease.
Coupled together with a well padded and snug pair of cycle shorts (see below), I had absolutely no issues with penial numbness, chaffing or other saddle-related injuries. This was expensive, but it was money well spent.
The Pedals and Shoes
The pedals and shoes were a large part of my success.
For shoes, I was wearing Specialized Rime Mountain Bike shoes, which were a solid tramping boot with recessed cleats for hill climbing. I could walk up the rockiest trail, cross the wettest ford, and still jump on my bike on the other side, cleat in, and power up the hills.
Having this type of shoe is a big deal, and look to get something similar.
The other thing I had changed on my bike were replacing its pedals with dual pedals – something like this. Pedals like that allowed me to cleat in on the hills and the straight to improve the efficiency of my peddling, but also spin the peddle over for the rough mountain bike tracks like Queen Charlotte where there’s the chance you might take a spill and you don’t want to be cleated in. I got all the grip of a mountain bike pedal when I needed it, and all the power of a road bike pedal when I needed it.
The Tires
The factory-fitted tires on my bike WERE THE WORST!
I’d never been one to care about the tires and stuff: you sorta expect those will be all about the same. But, on this ride, I was So Wrong.
You want really really good wide tires for the Sounds to Sounds. It helps in the thick gravel. It helps in the large boulders which pass for a road up the Nevis. And it helps on the Queen Charlotte where the rocks and the tree roots cut up shitty tires within 28 kms of the start.
I ended up swapping my factory fitted tires for 2.2 inch Maxxis Ikon’s . In hindsight, given the amount of gravel, I might have even gone wider, up to their 2.35 inch width.
The Clothes
My initial post had me packing way too much stuff. The revised list is:
- 3 sets of base layer shirts: the KMDCore Polypro series is fine. Don’t get white.
I packed two base layers, and lived in each for over a week at a time. I was only able to do washing twice on the 17 days I was away, which is why I recommend three of these. You will live in them. Buy the long sleeved versions, because you can make those short when its hot. But you can’t make the short sleeve version long when its cold. - 1 set of base layer long johns: Follow the same link above. Initially, I had packed two long johns – I just didn’t need them. Pull these out on cold mornings, or going to bed.
- Water proof pants: I brought these and even though they were expensive, I felt they were worth it. They just give your long johns / cycle shorts much better protection on those foggy early starts.
- One Merino MIDWEIGHT middle layer: its really really important that you focus on the material weight of this layer. Something like this. Here’s a link from Icebreaker’s site on material weight differences https://www.icebreaker.com/en-nz/baselayers?selectLocale=true#plp-marketing-insert-modal Something like this is correct weight for this layer.When you get up to the top of the different saddles, you’ll really appreciate this layer.
- One outer layer. Something like this. This layer wraps you all up, giving a breathable shell over your base and middle layer. The main thing with this layer is that’s its breathable fabric – you don’t want something that will cook you inside like some sort of stupid christmas pudding. My jacket created a wetsuit affect: I was soaked to the bone, but was fantastically warm.
- Gloves: These are perfectly fine. They’re going to get wet, but as long as your digits don’t fall off through frostbite, then job done.
- Head and Face Protection: Something like this and this. The good thing about the hat is it scrunches down to next to nothing.
- 7 pairs of throw-away socks: I brought a few packs of these. They didn’t take up much space, I wore each a couple of times. They all got soaked in the fords. And then I threw them away.
- 2 sets of cycle pants. I packed both a set of shorts like this and a bib like this. I ended up spending more time in the shorts than the bib for reasons of convenience: if I wanted to go to the loo, I didn’t need to take off my short. The pro’s for the bib is that it supposedly holds the arse padding in place, where the shorts might move around. I didn’t find this at all – the tight elastic at the bottom of the pants held everything in place. Even though I’ve got a set of these, I stayed away from them: too bulky for bikepacking.Next time, I’ll pack just the shorts. They also packed down smaller.
The Underpants Debate
There’s a debate in cycling circles around cycle pants next to your skin or over undies. Some riders wear cycle pants next to their skin an used butt butter to “glue” everything in place against the skin. Other cyclists – myself included – wear underwear underneath the cycle pants which “locks everything in place” without needing butt butter.
The difference is, wearing underpants, the edges of the underpants will form a pressure point, and create a chaffed area. But the chaffing comes at the advantage of hygiene – its much easier to change your undies everyday than work with the cleaning requirements of the same undergarment in a high pressure, high sweat, high bacteria area as your butt and groin.
I brought 7 pairs of undies, and wore them under my cycle pants. And yes, I got pressure sores from the rubbing of the undies edges by about day 3-4. But on day 9, my skin hardened up and I didn’t notice the discomfort. I took butt butter with me, but it didn’t help the healing process – it just greased and gave my arse a lovely shine. And on the plus side with undies is that I had no hygiene issues.
So, I’ll add to my gear list:
- 7 sets of underpants. Pack them down nice and small. Ditch the Butt Butter.
The Electronics
My electronics were essentially good. The front and back lights were powerful and fantastic. The main thing I’d change is I’d ditch the bluetooth keyboard – I just didn’t use it.
Navigation is important – buy the guide book as a PDF so you can refer to it on your phone.
Also, make sure you’ve got a good navigation app on your phone which you can overlay the course GPS onto different types of maps. I use the paid version of New Zealand Topo Maps and Vic uses Komoot. You want to be able to cross-check your actual GPS location with where the guidebook reckons you should be. At different points, you will go inadvertently off course.
Also, while we’re on it. Download Useful Knots and learn some knots. Its WAY better to know a knot and not need it, than need a knot and not know it (see below)
Food
I got into a habit where I’d wake, eat an apple, hit the road, and then maybe start continuously eating my One Square Meals about 2 hours later. But the time I got somewhere, I’d eat dinner there.
I found my food habits changed as my fitness/muscles changed. When I first started, I was hungry and thirsty all the time. At the Culverden Bakery, I hoovered down two pies, two sausages and a coffee.
But when my muscles developed and my fitness improved, I was able to do much much more exercise before the hunger pains started.
On those nights where I was camping out, I’d buy a tin of tuna (make sure it has a pull-tab opener, so you don’t need a can opener), and a small loaf of german rye bread, or something with density. And that was dinner: tuna sandwiches, sans butter. Also, you don’t have to eat all the bread.
I also brought a cheap salami, because being a cured meat, it was protein-rich, but naturally preserved against going off.
And, apples, apples, apples. What made apples so great was they were high in quick-sugars: easily transformed into instant energy, but they were also filling, high in fibre and no-bruising. I could keep an apple in my bag for days, pulling it out when I needed it.
My weight changed significantly. The day of setting out on this ride, I officially clocked in at 106.7kgs. When I returned, 17 days later, I was 100.1kgs.
I’m eating smaller, feeling less hungry, and feeling a lot healthier – this ride objective gets a solid tick!
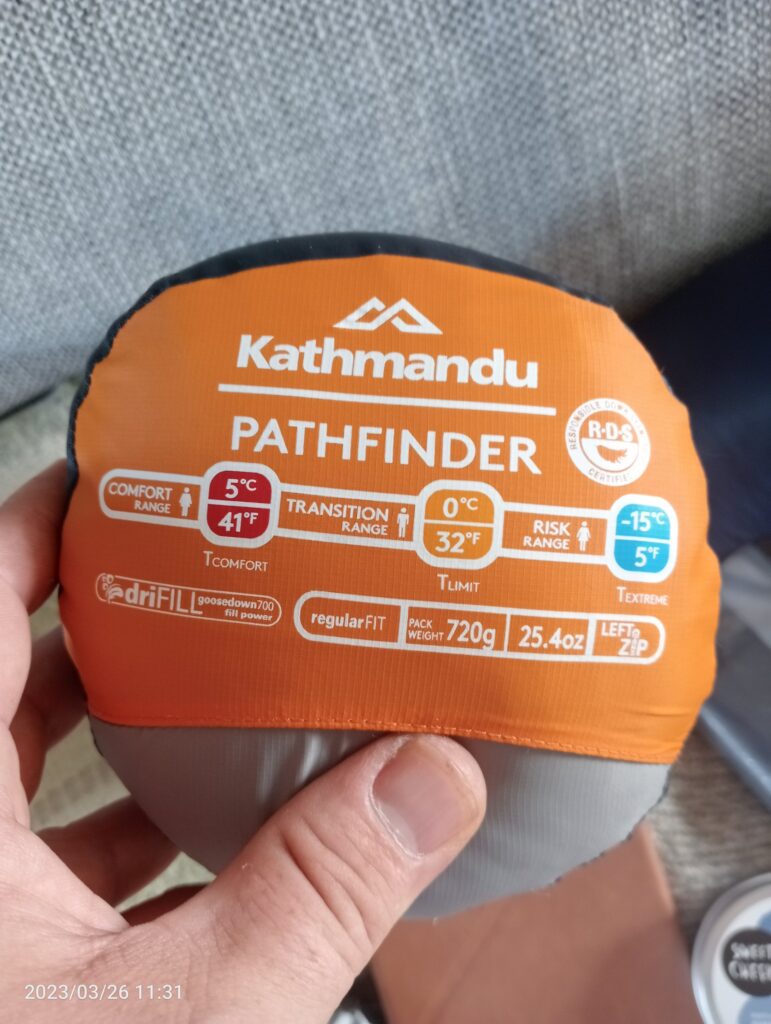
Tent and Sleeping Bag
Spend the bucks on a sleeping bag that goes WAY past zero degrees. The temperature got down to zero, and while I didn’t freeze with my sleeping bag, I wasn’t comfortable. I’m going to buy a new one.
Money spent here is worth it
- Kathmandu Range: https://www.kathmandu.co.nz/gear/camp-hike.html#/filter:sleeping_bags_comfort:Below%200%C2%B0C
- MacPac Range: https://www.macpac.co.nz/winter-sleeping-bags
Buy a sleeping bag liner: you’re smelly, sweaty, and stinky when you hit the sack. You’re not going to have a shower before bed. Buy one of these preferably the silk number, because it squeezes down really small.
The Bits You Don’t Thinking About
- Small hand towel/dish cloth
In the rain, when you want to check your phone, I wrapped my phone in a small dish cloth I “found” at a camping ground kitchen. When I needed to look at my phone, I could dry my hands. I also wrapped my phone within it used it to keep water away from my phone. - Ziplock bags
You’ll be surprised how, in the natural course of things, dust creeps in everywhere or things become damp. For example, my toothbrush would introduce water to my bathroom kit. - Bungie cable
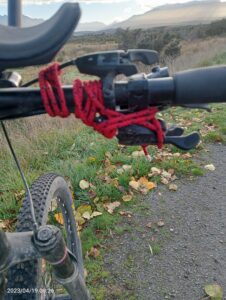
Always comes in helpful. I used it to secure wet washing to back rear bag so it dried as I rode. - Zip Ties
Great for strapping your SPOT device to something. Just to be aware that if you put hard plastic of the tie against the soft plastic of the SPOT, and tighten the tension between each, the tie will cut through the SPOT’s plastic. As I found out. And then the bungie had a new job, - 4 meters of marine-grade rope: You just never know when you need to lash something on. How are you going with learning those knots from Useful Knots?
- A really good pocket knife
Shaper the better. And no, you don’t need the fancy one with a toothpick. - Antibacterial soap
Keeps germs at a minimum, and also doubles as shampoo. - Tools
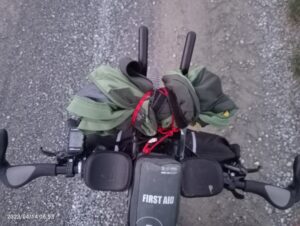
Pack a stupidly good multitool which does everything including chain break. - First Aid Kit
You might not use it, but it will make your partner feel happier. - Bike Lube Equipment and Spare Tubes
Also, at the end of every day’s ride, dust off your cycle chain with a hard toothbrush and oil it. After every day’s ride. Keep your chain good!
Bits I didn’t need
- Bluetooth Keyboard
- Travel towel: Didn’t need it – I was able to hire a towel every where I stayed as part of the room cost or for an extra $2. And then I didn’t need to look after a wet towel.